In Part 1 we have prepared servers and underlying network for the Failover Cluster installation. By now we are in the following state:
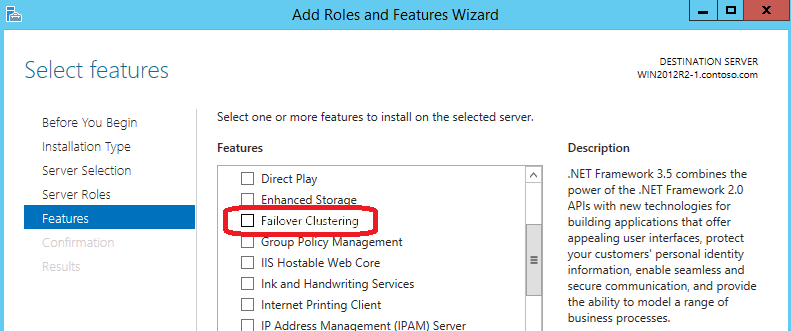
Failover Cluster is a Windows feature, so we just need to enable/install it:
 Continue reading
In Part 1 we have prepared servers and underlying network for the Failover Cluster installation. By now we are in the following state:
Failover Cluster is a Windows feature, so we just need to enable/install it:
 Continue reading
I was keen to test SQL Server AlwaysOn feature for some time now. And in this post I’ll share some of the configuration steps that I have encountered by bringing AlwaysOn cluster on Amazon EC2.
There is a really helpful Amazon whitepaper related to this topic [AlwaysOn], but I’ve decided to make my life complicated and chose to use Free Tier micro instances [t1.micro]. As a result I had to change the networking design quite significantly.
Micro instances have a restriction on the network interfaces: each instance can have 2 network adapters at most and each adapter can have a maximum of 2 IPs enabled. This is a purely EC2 limitation, in Windows I can configure as many IPs as I want, but they won’t be able to interact with the network. EC2 will be filtering out invalid IP addresses.
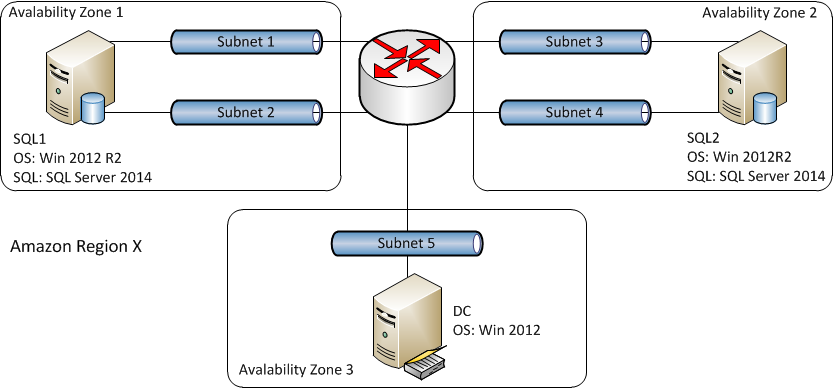
OK, so lets start with the high level design. I want to have two SQL servers located in the separate sites [separate Amazon Availablity Zones], belonging to the same SQL AlwaysOn Group. Because AlwaysOn is based on Windows Failover Cluster I need that as well, just without a shared storage. And I also need a Domain Controller, puting it in yet another site.
Continue reading
Internet Explorer has a notion of security zones. Security properties are accordingly configured for every zone. Internet zone is more restrictive comparing to the Intranet, which is a very trusted location.
There is one more setting called “Protected Mode”. You can see it on the screenshot:
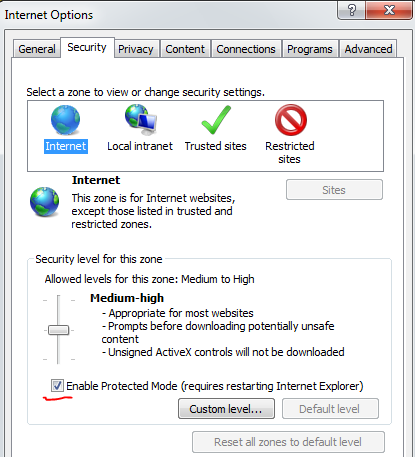
It can be enabled or disabled. The recommended state for each of the zones is this:
IE executes with more restrictive priviliges when Protected mode is Enabled.
If this tick was not disabled by the Group Policy then there is a great chance that your users made their own IE security improvements 🙂
So, the question is – can we find out how security zones are curently configured for every user in our environment? And the answer is of course yes 🙂
Continue reading
Let me first describe the issue.
The remote office users are on Windows 7, there are several local RICOH printers configured over the local network.
When users want to connect to the enterprise they login to the XenApp Web Interface and then run a Pulished Desktop.
Office applications are used within the Published Desktop and threfore when there is a need to print a document it have to be redirected to the locally attached/configured RICOH printer. In other words, when user tries to print from the Published Desktop he/she should be able to see/select a locally configured printer.
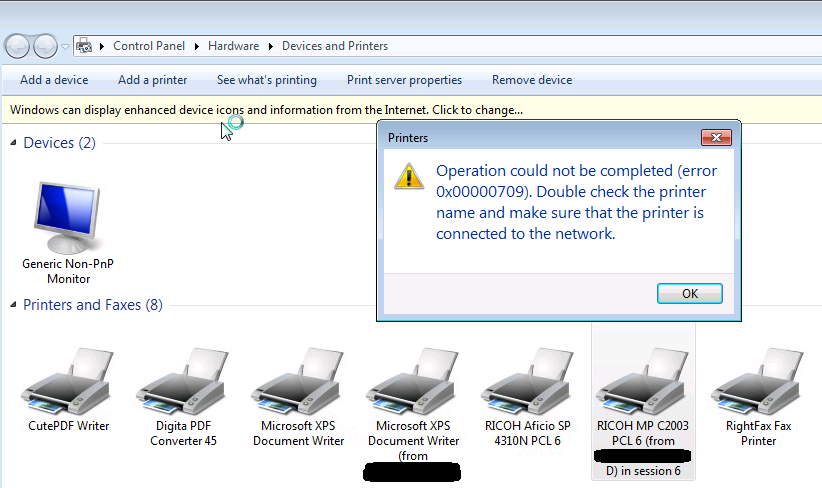
Now, here is the problem – user can actually see the printer from within XenApp desktop but the printer can not be selected. The printer or I should probably say the printer driver is not initialized correctly. If I look at the Printers console on the server I see the printer being created for the user session, but if I would try to open the properties the following “0x00000709” error message would appear:
Continue reading
Printing on Citrix is a very intresting topic :). There are many things that you should be awair of to make it working flawlessly.
Her I’m going to show a short script that can help you in identifying inconsistent Printer Drivers accross your XenApp environment.
In a nutshell, we have to make sure that the driver version installed on a Print server or on a Client machine [depending on the type of printing redirection you use] is the same as on a XenApp server.
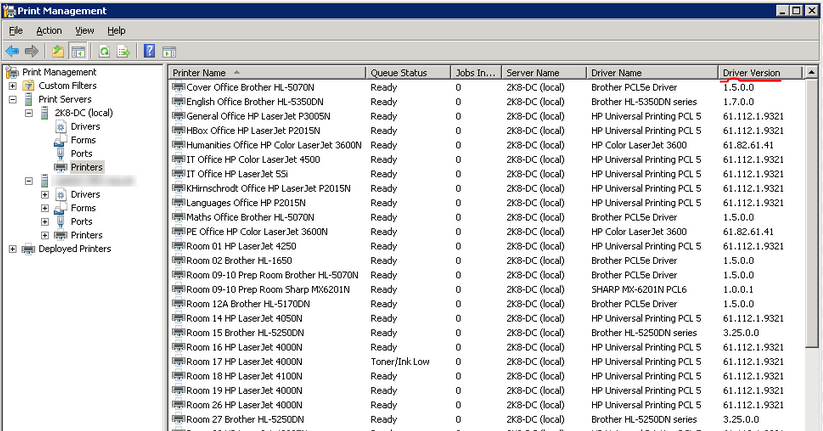
The manual approach requires as to open a Print Managment console on each of the machines and then do a comparison of the Driver Names and Versions:
Windows 2008 AD Group Policies has a very useful and practical feature – Drive Maps.
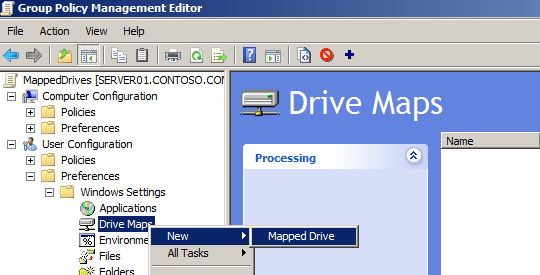
If you want to have a centralized place of your user network drive mappings then this option is for you.
Configuration is very flexible as you can filter targeted users by OU, security group and even by their user name.
Now, all is fine until your list is short, but when it has grown to the dosens of mappings the managability becomes an issue.
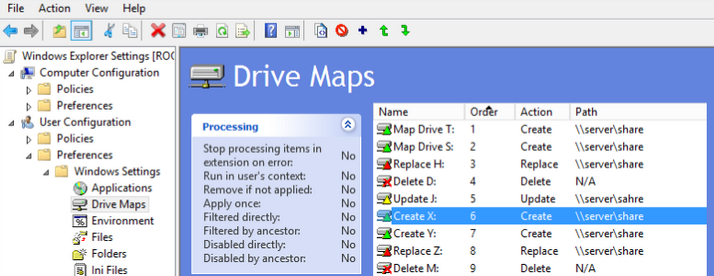
The problem is in the interface. It does not show you the filtering rules at the front, to see them you have to open the mapping, then go to “Common” tab, then select “Targeting” and only then you will see your Filtering rules. OMG 🙂
Continue reading
Have you ever wondered what are these?
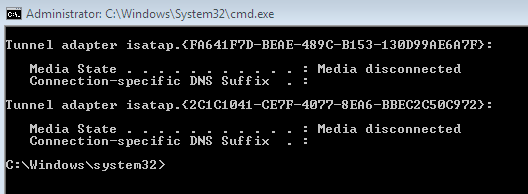
if no, then here is a quick explanation http://en.wikipedia.org/wiki/ISATAP
In any case I’ve decided to get rid of them because every time I run ipconfig /all I get a lot of useless stuff and it’s pretty annoying 🙂
Continue reading
From time to time our Citrix XenApp users would complain about slow applications and slow interactive responses, etc. XenApp is a shared environment therefore it’s not that difficult for a single application to occupy all CPU or Memory. So, I have asked myself can I detect a process or processes that are consuming most of the resourses, both CPU and Memory.
Here is the script that I’ve developed to do a simple monitoring.
It works by querying remote servers through WMI class Win32_PerfFormattedData_PerfProc_Process:
cls

# Lets make an array of servers we will be querying
$Servers = "XENAPPSERVER1","XENAPPSERVER2"
$Servers += "XENAPPSERVER3"

foreach ($Server in $Servers)
{
    $Server

    # Select top 5 CPU consumers [processes]
    $TopCPU = gwmi -computername $Server Win32_PerfFormattedData_PerfProc_Process | select IDProcess,Name,WorkingSet,PercentProcessorTime |
    where { $_.Name -ne "_Total" -and $_.Name -ne "Idle"} | sort PercentProcessorTime -Descending | Select -First 5 #| ft -AutoSize

    # Select top 5 Memory consumers [processes]
    $TopMemory = gwmi -computername $Server Win32_PerfFormattedData_PerfProc_Process | select IDProcess,Name,WorkingSet,PercentProcessorTime |
    where { $_.Name -ne "_Total" -and $_.Name -ne "Idle"} | sort WorkingSet -Descending | Select -First 5 #| ft -AutoSize

    # Lets get all running processes [This one shows ProcessID and User name]:
    $AllProcesses = Get-WmiObject -computername $Server win32_process

    # Now, we can combine information from preveous queries [that is map CPU/Memory and User through the ProcessID]
    # First filter by top CPU utilization
    ' Top CPU'
    $TopCPU |
    %{
        $ID = $_.IDProcess
        $CPU = $_.PercentProcessorTime
        $Mem = [Math]::floor($_.WorkingSet / 1024 / 1024)

        #$AllProcesses | where {$_.ProcessID -eq $ID} | Select @{name="Owner"; Expression={$($_.GetOwner().User)}},`
        #Name, @{name="CPU"; Expression={$CPU}}, @{name="Memory"; Expression={$Mem}}, ProcessID | FT -Autosize

        # I need to extract the Owner name and Process name
        $AllProcesses | where {$_.ProcessID -eq $ID} | % {$OwnerName = $_.GetOwner().User;}
        $Proc = $AllProcesses | Select Name, ProcessID | where {$_.ProcessID -eq $ID}

        # Finally compiling the resulting string
        $RezultsCPU = '  ' + $CPU + ',' + $Mem + ',' + $Proc.Name + ',' + $Proc.ProcessID + ',' + $OwnerName
        if ($CPU -gt 30)
            {$ColourCPU = 'Red'}
        else
            {$ColourCPU = 'Green'}
        Write-Host $RezultsCPU -ForegroundColor $ColourCPU
    }
    ''
    # Second, filter by top Memory utilization
    ' Top Memory'
    $TopMemory |
    %{
        $ID = $_.IDProcess
        $CPU = $_.PercentProcessorTime
        $Mem = [Math]::floor($_.WorkingSet / 1024 / 1024)

        #$AllProcesses | where {$_.ProcessID -eq $ID} | Select @{name="Owner"; Expression={$($_.GetOwner().User)}},`
        #Name, @{name="CPU"; Expression={$CPU}}, @{name="Memory"; Expression={$Mem}}, ProcessID | FT -Autosize

        # I need to extract the Owner name and Process name
        $AllProcesses | where {$_.ProcessID -eq $ID} | % {$OwnerName = $_.GetOwner().User;}
        $Proc = $AllProcesses | Select Name, ProcessID | where {$_.ProcessID -eq $ID}

        # Finally compiling the resulting string
        $RezultsMemory = '  ' + $Mem  + ',' + $CPU + ',' + $Proc.Name + ',' + $Proc.ProcessID + ',' + $OwnerName
        if ($Mem -gt 400)
            {$ColourMemory = 'Red'}
        else
            {$ColourMemory = 'Green'}
        Write-Host $RezultsMemory -ForegroundColor $ColourMemory
    }
    ''
}
There are cases when we want to control how much CPU a particular process can consume.
Current servers are mostly having more then one processor therefore one of the quickest ways of limiting CPU allocation is by setting CPU affinity for the process.
This particular script was written for the Citrix XenApp environment where it was identified that sometimes Internet Explorer was consuming all the avilable CPU and as a result slow down the whole server. Users are not happy 🙂
By setting only one processor for the IE process we can isolate the issue [at least to some degree].
#Get the time for logging purposes
$D = Get-Date
$T = '' + $D.ToShortDateString() + ' ' + $D.ToShortTimeString()

#Select only iexplore proceses
$Proccesses = Get-Process | ? {$_.Name -eq "iexplore"}

#For each iexplore process do
foreach ($Proccess in $Proccesses)
{
    #Find current CPU utilization
    $CPUUtil = (get-wmiobject Win32_PerfFormattedData_PerfProc_Process | ? { $_.idprocess -eq $Proccess.id }).PercentProcessorTime

    '' + $CPUUtil + '% - ' + $Proccess.id

    #If CPU is higher then 50 then change process affinity to use only second core [there must be at least two cores]
    if ($CPUUtil -gt 20)
    {
        Get-Process -id $Proccess.id |
        %{
            #$_.ProcessorAffinity;

            if ($_.ProcessorAffinity -ne 2)
            {
                #'Changing from ' + $_.ProcessorAffinity + ' to 2'
                $_.ProcessorAffinity = 2;
                '' + $T + ': ' + $CPUUtil + '% CPU, ' + $Proccess.id + ' PID, ' + $Proccess.Name + ', CPU Affinity for the process "' + $Proccess.id + '" is set to ' + $_.ProcessorAffinity + ' because of ' + $CPUUtil + '% CPU utilization' >> C:\Temp\ControlProcessesAffinity_Log.txt
            }
            else
            {
                '' + $T + ': ' + $CPUUtil + '% CPU, ' + $Proccess.id + ' PID, ' + $Proccess.Name + ', Affinity have already been set for this process to 2, current value is: ' + $_.ProcessorAffinity >> C:\Temp\ControlProcessesAffinity_Log.txt
            }
        }
    }
}
Inheritance has been fixed in the previous post. Now, would it be nice to have some sort of a report that could find me folders/files that have wrong settings no matter how deep they are. This script would confirm that previous changes were successful.
We are going to look for a specific group in the ACL by parsing CACLS output.
In this example I’m looking for a “GG-ADM-S” group.
Here it is: Continue reading